MogNotate
What is MogNotate?#
MogNotate is a program to help preview what your midi file will sound like when played in-game. It is also used in the essential step of converting a .mid file into a .mmsong file, which is the file format that MogAmp uses.
Generally, you will want to preview a song in MogNotate before playing it for an audience. Doing this will help you decide what instruments to use, as well as spot errors and mistakes you'd otherwise miss. MogNotate will also help simplify your songmaking proccess by handling some tasks for you, such as distributing notes to multiple players using the same instrument.
Importing songs into MogNotate#
There are two ways to import songs into MogNotate: The first is to import in a BMP formatted midi, the second is to write or edit an existing .yaml file and import that.
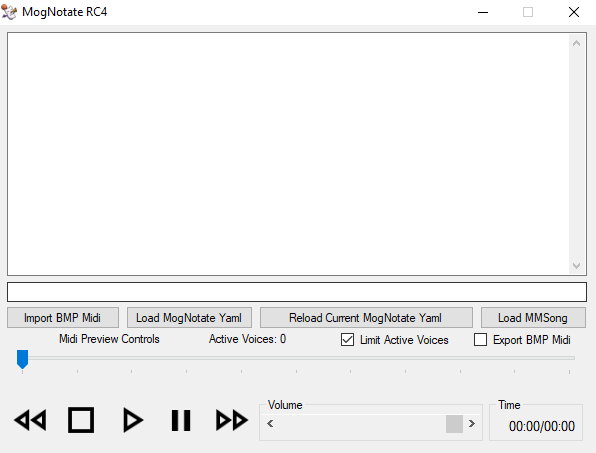
If you were previously using BMP and have your .mid files formatted to be used in it, then most of your work is already done. Simply click the "Import BMP Midi" button and select your .mid file. Importing in a midi file this way will automatically create a .yaml file for you. BMP formatting is pretty simple, and mostly just involves renaming any tracks you want to use. It's even a good starting point, if you want to make further changes to the .yaml file MogNotate helps you create.
Writing or editing a .yaml file directly gives you some additional features, such as the ability to map percussion tracks, add multiple instruments for a single track, or even give your song lyrics. The file can be opened in any basic text editor, although a graphical user interface to build and edit the file specifically for use in MogNotate is in the works. Once your .yaml file has been created, click the "Load MogNotate Yaml" button to select it.
If you make any changes to the .yaml file, you can click "Reload Current MogNotate Yaml" to update MogNotate and hear these changes.
Doing any of these will also generate a .mmsong file. This file is unique to MogApp, and contains both the song data as well as things like instrument selection and lyrics. This .mmsong file is what you will need to select a song in MogAmp when it's finally time to perform your music. If you want to go back and appreciate your past work, you can also load a .mmsong file into MogNotate to listen to it by pressing the "Load MMSong" button.
About BMP Format#
Bard Music Player, a separate barding program, set the standard of track names being used to denote what instrument a track would be played with, and in what octave. Much of the bard community was already used to formatting their .mid files like this and had extensive libraries in this format, so having a way for MogNotate to import in a .mid file formatted this way saved a lot of work. The majority of the bard community uses the program MidiEditor to edit .mid files, although several other programs can be used to create or edit them.
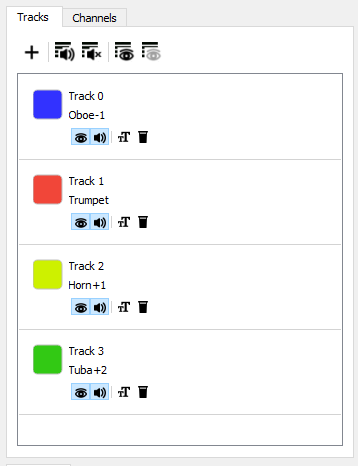
To convert a midi file to BMP format, the first thing you need to do is to make sure there is a track for every instrument. Note that "tracks" and "channels" are separate things, and that neither BMP nor MogNotate will read or use channel data.
The second step is to rename every track to the name of the instrument you want to assign to that part. Additionally, if the notes in the midi file for that instrument are not in the default octave range (C3-C6), you can specify a different octave range in the name of the track with a positive or negative number, indicating how many octaves to shift a track up or down to bring it into the C3-C6 range.
For example, the following are valid BMP Format track names:
| Track Name | Description |
|---|---|
| Flute-1 | A flute in the octave range C4-C7 |
| Harp | A harp in the default range of C3-C6 |
| Horn+1 | A horn in the octave range C2-C5 |
| Tuba+2 | A tuba in the octave range C1-C4 |
Note that any notes that are outside of your chosen three octave range will be ignored.
Once you have made your instrument and octave range selections, save your .mid file and import it into MogNotate to generate both a .yaml file and a .mmsong file, then hit play to hear it played.
About MogApp .yaml files#
When you import in a BMP formatted midi, a .yaml file will be created for you. However, you may want to make changes to the song using this file, or you may want to write a .yaml file yourself and skip this step.
Let's look at a working example of a .yaml file that contains an example of everything you will likely need.
There's quite a bit to unpack here, so let's just go down this file and explain what everything is doing. It's not really as complicated as it looks at first glance.
File header#
The first thing you will need to do is give your song a title, a description, and tell it what .mid file it will reference.
- title: - Here is where you put the title of your song. This is the title that will show up when you select the song in MogNotate or MogAmp. Conveniently, you can copy/paste the name of the song from MogAmp, if you want to tell your audience what you're playing.
- description: - By default, MogNotate will fill this in with how many bards and singers it requires when you import a Midi, but this can be whatever you want it to be.
- file: - Here is where you will copy/paste the name of the .mid file you will be using. Note: You will probably want to keep your .mid files in the same folder as your .yaml files.
Instrument selection#
Everything after standard: and up to the drum: line will be your standard instrument selection choices.
- - tracks: - Here is where you will select what tracks a particular instrument section will use. Normally you will only pick one track, but you can also assign multiple tracks to the section like this:
- instrument: - This is the instrument that will be given to the bard or bards that play this section. Note that currently you can only assign one instrument per section. Also remember that instrument names are capitalized with spaces removed. For example, the double bass would be
DoubleBass. - octave: - The octave range for the notes in the midi file that you want to be played. The number refers to the octave of the lowest C note in that octave range. For example,
octave: 3means C3-C6,octave: 2means C2-C5, andoctave: 4means C4-C7. - bards: - While you can only assign one type of instrument per section, you can give that instrument to multiple bards! This is especially helpful for tracks with polyphony or chords. A note will only be played by one bard at a time, but if a chord pops up, MogNotate will distribute those notes evenly between the bards.
- modifiers: - In the future, an optional setting will be added that modifies how the program interprets the notes selected. Each track in a section will have a pre-merge modifier, and at the end there will be a post-merge modifier. There will be possible modifiers: ignore range and move range.
Drum mapping#
One of the biggest inconveniences in writing bard music in Midi is that the in-game percussion are pitched, while the percussion instruments in midi files are assigned to notes on the percussion channel in an orderly, yet non-pitched fashion. MogNotate will help you by mapping percussion events to their proper in-game note for the bass drum, snare drum, cymbal, and bongo! Note: The timpani actually IS a pitched instrument in real life, and will usually be mapped in the standard instrument section above.
If you have no drums in your song, you can simply leave the section blank with drums: [].
This part is very similar to the standard instrument assignment section. You will select which tracks to use with - tracks:. You can then assign how many of each kind of drum instrument you would like to give this section with the commands snare_drum_bards:, bass_drum_bards:, bongo_bards:, and cymbal_bards:.
MogNotate will use its default percussion mapping settings, but you can further customize what midi percussion notes get assigned to what instrument and what in-game note. For more information on this, as well as a list of the default percussion mappings, check out the page on the drum mapper.
Lyrics mapping#
MogNotate and MogDoot both support lyrics! If a song has lyrics, then any performer who is assigned a singing part will have lyrics copy/pasted into the chat box in time with the music. The lyrics themselves are written in the .yaml file, while the timing of those lyrics are handled in the midi file with what are called "keyswitch events", which are basically just notes played super low.
If your song has no lyrics, simply leave the section blank with lyric: [].
If you would like to add lyrics to your song, check out the page on the lyrics mapper.
What are "active voices"?#
In FFXIV, every time you play a note, you are playing a sound sample. Even if you let go of that note, the sound sample will continue to play to completion. This is called a "voice". The actual length of this sound sample depends on the instrument in particular, and can last around a second or more. Essentially, when you strum a three-note chord on your harp, you are actually creating three overlaping voices.
The reason we care about this system is that FFXIV limits the amount of notes that are playing at any one time client-side. This limit is 16 active voices at a time. This sounds like a lot, but with particularly fast songs with many parts, you can easily hit this limit. When this limit is hit, any new voices being added will trigger the sudden deletion of the oldest still active voice.
This is most noticeable for longer, sustained notes that play while another instrument (or several) plays a faster section with more notes. However, if the oldest voice is a note that has long since stopped being audible, then this deletion is not a problem.
MogNotate will simulate this system, displaying the active number of voices playing at any one time. This will help you spot sections of your song where a sustained note may suddenly be deleted because of too many active voices. If you would like to hear what a song would sound like without this system, you can uncheck "Limit Active Voices" to remove this cap.
In-game octave ranges#
Every instrument in FFXIV has a three octave range, from a low C to a high C. However, not every instrument has the SAME octave range. Some instruments are naturally higher or lower in pitch than others, and knowing what particular octave range an instrument plays in will help you arrange your music and make better instrument selection choices.
| Instrument | Octave range |
|---|---|
| Piano | C4-C7 |
| Harp | C3-C4 |
| Fiddle | C2-C5 |
| Lute | C2-C5 |
| Fife | C5-C8 |
| Flute | C4-C7 |
| Oboe | C4-C7 |
| Panpipes | C4-C7 |
| Clarinet | C3-C6 |
| Trumpet | C3-C6 |
| Saxophone | C3-C6 |
| Trombone | C2-C5 |
| Horn | C2-C5 |
| Tuba | C1-C4 |
| Violin | C3-C6 |
| Viola | C3-C6 |
| Cello | C2-C5 |
| Double Bass | C1-C4 |
| Timpani | C2-C5 |